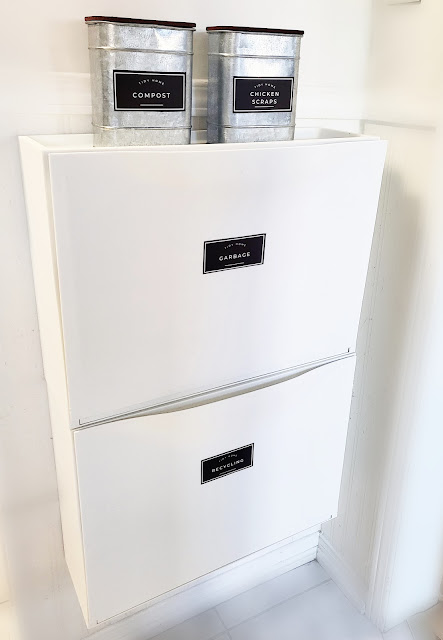
Space is at a premium in our small-sized kitchen.
Our garbage can and recycling can were taking up floorspace, while our compost and chicken scraps bin were using up valuable counter space.
And then I came across two Ikea Trones shoe storage bins for sale on Facebook Marketplace. At $5 a pop, I couldn't resist! Now that I have this space-saving garbage sorting set-up, I'd buy them new if I wasn't able to find them used!
They look SO much better than basic garbage cans, and they fit perfectly on an awkward wall in our kitchen. Because they're off the floor, we no longer have crumbs hiding behind bins.
I designed simple labels to designate each bin, and to take this Ikea hack up a notch! You'll find them for download at the bottom of this post. If you'd like to customize the labels, I've also provided a link to a template on Canva. You can edit and change them up as much as you like!
How to hack the Ikea Trones shoe cabinets to create a trash, recycling & compost sorting center:
1. I attached the cabinets to the wall with drywall mounts, ensuring that they were level.
2. I used a drill to create notches on the sides of each shoe compartment, about an inch away from the front panel. These notches are about 1 inch to 1.5 inches long. You could also use a strong serrated knife to cut notches instead.

The notches provide a spot to secure a garbage bag and keep it from sliding down. Just place either side of the bag into the notches, and then pull the rest of the bag around the sides and back of the shoe compartment. So far this method of keeping the garbage bag in place has worked really well!
3. I used these adorable galvanized metal containers that I found at Dollarama. They fit perfectly on top of the Ikea Trones shoe cabinets, and there is room to add more if needed!
Originally the metal containers had painted labels on them. I was able to easily scrub off the paint with water and a metallic scouring scrubber, like these ones:
4. Then comes the fun part: labeling each compartment and container! I labeled the Trones compartments as "Garbage" and "Recycling", and the metal containers as "Compost" and "Chicken Scraps", since we separate out the kitchen scraps that our chickens can eat.
The labels I designed are square-shaped, but I ended up trimming them down to about 1/8th of an inch around the white border. Trimming them gives them a tidy, streamlined look, but they would look great with their original size too!
I printed my labels using my Dymo 4XL Label Printer, but you could also print them on regular paper and use clear contact paper, or even clear packing tape to adhere them to your containers.
The finished set up looks so good! And it's really easy to use.
Each compartment of the Ikea cabinet holds quite a bit. We empty our trash & recycling everyday, and this is more than adequate for the amount that we produce.


.jpg)


What a great idea! I might have to make one of these. We have an IKEA nearby.
ReplyDeleteI love wandering the aisles of Ikea! I wish I was closer to mine 🙂
DeleteWhat a great idea for trash. I love those labels.
ReplyDeleteThank you! They look super cute!
DeleteThis is a really awesome idea! This is perfect for our small kitchen! Love it! -Richelle Milar
ReplyDeleteThank you! 😊
DeleteI really need to make one of these. What a really mice and cool idea! Thanks for sharing this with us - Rose Ann Sales
ReplyDeleteRight? Such a simple idea, but it works out so nicely!
DeleteWhat a brilliant and inexpensive kitchen hack! Like you, we have our garbage and recycling bins taking up valuable real estate on our kitchen floor!
ReplyDeleteThank you! I've found that every square foot makes a difference in our little house 🙂
DeleteThis looks like such a wonderful idea, I love how it feels like it's tucked away and how easy it is to sort!
ReplyDeleteWhat a great idea! We don't have a lot of space in our kitchen either yet. I may have to work something like this in mine.
ReplyDeleteThis is a cool idea. I hate that my trash can kinda floats around the kitchen. I’d do this but I don’t have much wall space free either. My kitchen is pretty small.
ReplyDeleteThat is such a great hack. I like things organized around here. Thanks for the idea! -LYNNDEE
ReplyDeleteThis is such a neatly organized system! Love it. I would love to take a trip to IKEA to put something like this together.
ReplyDeleteWhat size trash bag do you use?
ReplyDeletei want to know that as well!
DeletePost a Comment