The other day I happened to mention to my husband that I’d like to install a backsplash in our kitchen. We’ve lived here for over 7 years now, and while I really like the colour of our walls, the kitchen just doesn’t look complete yet. While I talked about tiles and grout, he kept suggesting we look at peel-and-stick options.
So, I started browsing Pinterest for other DIY ideas that didn’t involve grout, but that also didn’t involve dollar store tiles.
Backsplashes led to cupboard makeovers, which led to crown moulding which led to figuring out how to hide those bulkheads above our cupboards. And then eventually, my Pinterest rabbit trail led straight out of the kitchen into the living room.
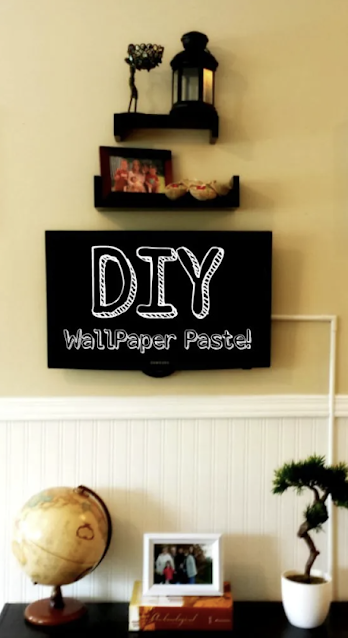
The wall our TV is on is flat (no crazy angles like the rest of our house) and boring. Browsing for ideas reminded me of the Beadboard wallpaper I used in our entryway, and I realized that I could use the same idea for our TV wall.
I had an afternoon free, so I headed to Home Depot to grab some Martha Stewart Paintable Beadboard Wallpaper, and some trim (the cheap kind 😉 ). I returned home, determined to finish this mini-project before the kids got home from school.
But then I discovered that Martha Stewart Paintable Beadboard Wallpaper does NOT come pre-pasted, unlike the Walmart version that I had used before. A quick trip in to our local Home Hardware revealed that no store-bought wallpaper paste was available in our little town. At all.
With no desire to head back to Home Depot in the next town over, I jumped back on Pinterest to see what I could find. There were several variations of homemade wallpaper paste, and with some adaptations, this is the recipe I ended up with:
DIY Wallpaper Paste
Ingredients
- 2 tbsp corn starch
- 2 cups water
Instructions
- Mix corn starch and water in a sauce pan, whisking until all lumps are gone.
- Over med-high heat, continue stirring occasionally until the mixture is boiling gently. It will look like a clear jelly.
- Let cool for a few minutes, and then apply liberally to the back of the wallpaper with a wide paintbrush.
- Book the wallpaper (fold with pasted sides together) for about 10 minutes.
- Hang wallpaper and smooth out any bubbles or wrinkles.
- Clean brush and pot with hot, soapy water.
Not only does this wallpaper paste spread easily, it is far less expensive than buying store-bought paste.
Word to the wise though: I’m using it in a well-ventilated, dry environment. You may want to look at adding a preservative (tea tree oil?) if you use this paste in a bathroom where there is any kind of humidity.
And now, after putting up the wallpaper and adding the trim, our TV wall looks like it has new life! The wallpaper adds that little bit of architectural detail that our wall was in need of, and it looks far more finished now.

Wallpaper: $26
Trim: $9
Wallpaper Paste: Free!
Trim Nails: on hand
Tools (wide paintbrush, damp sponge or plastic scraper to smooth the wallpaper, hammer): on hand
The total cost for this project: $35


Post a Comment